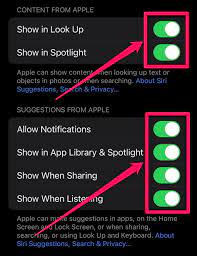
Are you looking to remove your Ring Doorbell? In this guide, we’ll show you how to do it step-by-step.
You’ll need a few tools, like a screwdriver, and we’ll walk you through the process of:
- Turning off the power
- Removing the faceplate and disconnecting the wires
- Detaching the mounting bracket
- Finally, removing the Ring Doorbell.
By following these instructions, you’ll have your Ring Doorbell removed in no time.
Step 1: Gathering the Necessary Tools
First, you’ll need to gather the necessary tools. To remove your Ring Doorbell, you’ll need a few things handy.
Grab a screwdriver with a small head, preferably a Phillips or flathead screwdriver depending on the type of screws holding your Ring Doorbell in place.
Ensure that you have a ladder or step stool nearby to reach the doorbell comfortably. It’s also a good idea to have a flashlight handy, especially if the area around your door is poorly lit.
Lastly, have a small container or bag ready to collect any loose screws or parts that may come off during the removal process.
Once you have all these tools at your disposal, you’re ready to move on to the next step.
Step 2: Turning Off Power to the Doorbell
Next, make sure you’ve switched off the power to the doorbell. This is an important safety measure before removing the Ring doorbell. To do this, locate the circuit breaker or fuse box in your home.
Look for the switch or fuse labeled ‘doorbell’ or ‘doorbell transformer.’ Flip the switch to the ‘off’ position or remove the fuse to cut off power to the doorbell. Double-check that the power is indeed off by pressing the doorbell button. If it doesn’t ring, then you’ve successfully turned off the power.
Remember, it’s crucial to follow this step to prevent any electrical accidents while removing the doorbell.
Now that the power is off, you can proceed to the next step of removing the Ring doorbell safely.
Step 3: Removing the Faceplate and Disconnecting Wires
Now that the power’s off, you can carefully detach the faceplate and disconnect the wires.
Start by using a screwdriver to remove the screws holding the faceplate in place.
Gently lift the faceplate away from the wall, being cautious not to damage the wires behind it.
Next, locate the wire connectors that are connecting the doorbell wires to the wires in your home.
Most likely, these connectors will be plastic and can be easily detached by squeezing and pulling them apart.
Once the connectors are detached, you can safely remove the wires from the back of the doorbell.
Remember to keep track of which wire is connected to which terminal so that you can easily reinstall the doorbell in the future.
Step 4: Detaching the Mounting Bracket
After you’ve disconnected the wires, it’s time to detach the mounting bracket. Begin by unscrewing the two screws located at the bottom of the bracket. Use a screwdriver or an electric drill to make the process easier.
Once the screws are removed, gently lift the bracket upwards to release it from the wall. Be cautious as the bracket might still be attached to the wall by adhesive or double-sided tape. If this is the case, use a flat-edged tool like a putty knife to carefully pry the bracket off the wall. Take your time and ensure that you don’t damage the wall during this step.
Once the mounting bracket is detached, you can move on to the next step in the process.
Step 5: Removing the Ring Doorbell
To disconnect the Ring doorbell, follow these steps:
- Locate the small screw at the bottom of the doorbell and unscrew it using a screwdriver. Remove the cover.
- Inside the doorbell, you will see the wires connected to the mounting bracket.
- Carefully unplug these wires by gently pulling them apart. Avoid pulling too hard to prevent any damage to the wires or the doorbell.
- Once the wires are disconnected, you can easily remove the Ring doorbell from the mounting bracket.
- Simply lift it up and off the bracket, ensuring a smooth and steady motion.
Congratulations! You have successfully removed your Ring doorbell.
Conclusion
So there you have it! Removing a Ring Doorbell is a simple process that can be easily done with the right tools and a little bit of patience. By following the steps outlined in this guide, you can safely remove your Ring Doorbell and have it ready for any necessary repairs or replacements.
Remember to always turn off the power before working on any electrical components and be careful when handling the wires. Good luck with your Ring Doorbell removal!